![]()
The following article, is basically a "how-to" on fixing up the shifter in your beetle. I did it on my '74 Superbeetle. Although it may not be the same year/model as your VW, it will be close enough to give you a good idea of what its going to take. This is not a very expensive project (which is a GOOD thing!) And only requires the most basic of tools. What I'm going to do on my car, is put in a brand spankin' new shift rod bushing, new bushings for the shift coupler, and a "Quick shift kit." As well as clean everything up, and re-grease. Your main resource for all these parts should be www.aircooled.net They will be happy to supply you with excellent quality parts, at a fair price, AND quick shipping. If your shifter is sloppy; your having missed shifts; the shifter rattles etc... this project is a definite MUST! Like I said before it is cheap, and will take you approximately one afternoon (if everything goes well).
![]()
This is what you should be starting out with. (Well, plus or minus the center console):

![]()
STEP 1) Gather all your tools, parts, and any other "help" guides you might be using: As seen in the pic below, I have my parts (from L to R: Quick shift kit, shifter bushing, and shift coupler) laid out, as well as my "help" guides; you should always have more than ONE opinion/source! (from L to R Hot VW's article "shift bushing R & R", John Henry's Article "Shifter bushing Replacement ", and the good 'ole Bentley manual.) The second Pic is just closer up of the actual parts.


As I said before, this whole process will use basic hand tools. The most common items you will need are: some grease (white lithium, and some heavy duty bearing grease), a flashlight, some pliers (needle-nose), wrenches (metric of course), some standard screw drivers, and some ratchets, extensions, and sockets.

The only other "odd" thing that you will need is some safety wire (bailing wire) for the screw that holds the shift coupler to the Transmission nose... You could PROBABLY use the old one, but it would be best to get some new stuff.

![]()
STEP 2) You will want to start taking apart your car, *gasp* :-) For my particular VW, I choose to take the Back seat out so I could gain easy access to the shift coupler; I also took out the Drivers seat, to make it a little easier to get to the shifter. You then want to pull up the front section of the carpet (if you really have to). Mine was just laying on-top of the floorboard (the P.O. didn't glue it).
![]()
STEP 3) You will want to start taking off the access panels to gain access to the shift coupler, and to get the shift rod out the front of the car. Depending on what year your VW is, you will probably have the access plates located in a little different locations, and there may be a few more of them. In the pic below, it shows the rear access panel, which when removed reveals the shift coupler:


As you can see in the picture the shift coupler and the end of the shift rod are really oily, which hints that the seal in the nose of the transmission is leaking. Mine WAS leaking, however I already fixed that (last summer) I just never got around to cleaning up the coupler.
![]()
STEP 4) Now you will want to go around to the front of your VW, and remove the tunnel frame head cover. My VW *originally* had what is called a "deformation plate" which helped absorb energy from a frontal impact, however mine was long gone, so I replaced it with a cover plate off of a standard beetle, that I picked up at a Junkyard. What you want to do is take of the deformation plate, or the cover plate (depending on what yours has). If it has neither, it IS a good idea to get one, or make one, to prevent road grime/dirt/dust from getting into you tunnel.


(just thought this pic was cool)

![]()
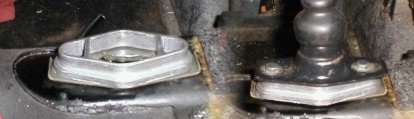
STEP 5) Now what you want to do, is take the shifter out. You simply remove the two bolts, and it comes right out (its a little bit spring-loaded).

Be careful not to lose the spring, bolts, or the plate! ALSO, remember which way the plate was in... In case you forget, the big "ski jump" should go to the passenger side, with the tabs facing up.

![]()
STEP 6) Now you want to disconnect the shift coupler from the shift rod. You hold the "ears" with a pair of pliers, and take a ratchet to the other side. Then slide those two pieces out, and get the bushings out.
![]()
STEP 7) Now its time to take the shift rod out of the tunnel! What I found works best is to use a pair of needle-nose pliers, and grab hold of it at the shifter hole, and kinda "push" it out. Once you get it pretty far out, you should be able to go to the front of the car, stick your hand inside the inspection hole, and start pulling it out.
As you can see there are only 2 of the 3 pieces of what is left of my old shifter bushing left on the shift rod. (normally you would take the old shift bushing out right after you pull the shift rod out... If its even there)

![]()
STEP 8) Now you can pull off the shift coupler from the nose of the transmission, by cutting off the safety wire, and unscrewing the screw. You should also look at the shift bracket inside the tunnel (right under the shifter and back a little) and check for the shifter bushing. If it didn't come out with the shift rod (as mine *mostly* did) than you need to pull it out of the bracket, assuming its even there.

Here is what's left of my old shift rod bushing. As you could see in a couple of the pictures above, two of the pieces came out with the shift rod, but as you can see in the pic below, the third piece was still in the tunnel.

![]()
STEP 9) Now is the time to clean everything up REAL good! I took off the boot on the shifter, and threw everything else in the parts cleaning bin.

Clean up everything, and dry the parts off (with compressed air preferably).
Here is what your shift tunnel should look like now (EMPTY). You may wanna check in there for trash, or broken pieces of bushing... That is where I found the third piece of mine. Basically you just want to make sure you wont have anything rattle around.

The shift rod was far too large to put in the parts cleaner bin, so I soaked a rag in the parts cleaner and wiped it down a bit, and then took a wire brush to it, to clean up some of the rust spots, so that it would slide back into the shift bushing easily. (its kinda camouflaged in the pic with all the *stuff* around it, but its in there)

![]()
STEP 10) Now you want to put in the new shift rod bushing. What I found best is to just make sure the clip is on it, and go ahead and push it right into its bracket. It should kinda 'click' into place, but check it to make sure its in all the way. The flange where the clip is should go facing towards the front of your VW. Once it is in, get some white lithium grease, and smear it all in the bushing. A few sources that I have read say that you should have the crack in the bushing towards the drivers side... You can accomplish this, however it may take a little more time as it tends to shift position when you put the shift rod in. PERSONALLY, I don't think it will affect anything adversely, but then again the German engineers knew mostly what they were doing when they put the car together; YOUR call.
![]()
STEP 11) Now that the bushing is in, you will want to put the shift rod back in! I found what works best is to lubricate the shift rod in a "step" process, AFTER you get it in the tunnel; That way it doesn't get dirt particles in the lubricant from resting inside the tunnel. Just put the shift rod in through the front of the tunnel (just like you took it out) and get it all the way up to the shifter hole. Once you get it there, get it lined up, and lube the end generously with some more white lithium grease. You may want to have a little help at this stage. One person needs to "guide" it in the bushing, and the other needs to push the shift rod from the front of the VW. Once it is started you *should* just be able to take a pair of needle nose pliers, and lift the shift rod up and "pull" it through the bushing, if this is not possible yet, take a scrap piece of (long) wood, such as a broom stick, and push it from the front. Be careful not to get hung up on anything in the tunnel, in other words DON'T FORCE IT! It should be a little stiff, but if it is not moving at all, that means you are stuck against something. Once you get it in about 4 inches, lube the area of the shift rod that is before the bushing, and push it in another 4 inches, and do it again... then do it again, etc. Also look through the tunnel in the front, and make sure the shift rod is in the middle of the tunnel. The first time I put mine in, it went to the left of a "line" (cant remember what it was) and it wouldn't line up correctly. Once it is through the bushing, take a flashlight and a small mirror, and check in the back (where the shift coupler goes) to make sure it is coming through the middle of the tunnel, and is not getting hung up on anything. After a while, you should have it just about where it was before you took it out.
![]()
STEP 12) Now you should install the shift coupler. What I found is that the new coupler 'cages' absolutely STINK! So I decided not to use it. Instead I just used the old cage, with all the parts from the new coupler. So far it has worked great! what you want to do first is attach it to the nose of the tranny, then get the shift rod positioned just right, and put in both side bushings, and slide the "receiver" in one end, and slide the bolt in the other. Hold the "ears" with a pair of pliers while tightening down the bolt with a ratchet. Once that is back together, don't forget to put a new piece of safety wire through the hole in the screw!

STEP 13) Now it is time to put the shifter back together. I will be explaining how to put the shifter together WITH a quick shift kit (reduces throw, by raising the shift angle). If you are not installing a quick shift kit, than disregard all instructions pertaining to it. Its pretty easy to put the shifter back together... Assuming its completely apart, what you want to do first is slide the little "mushroom" looking plastic bushing over the metal looking "mushroom" on the shifter rod itself (just clips on.) And then the first thing in installing the quick shift kit, is to put the "ball" with the hole through the middle right on down on top of the "mushroom". You now need to lubricate the ball. On the first installation I used white lithium grease, but once I installed it, it rattled. In the Bentley manual it says to use a "very thick" grease if your shifter rattles. So for the rest of the shifter lubricant, I used a thick bearing grease (axle grease). After the ball is lubed up good, slide the top plate over the shifter rod (its the part that the shifter pivots inside of). And then, you can reinstall the rubber shifter boot. Once that is done, your almost ready for installation in the car!
You now need to use this same thick lubricant, and put some on the ball of the shifter, and the part of the shift rod (in the tunnel) that this ball goes into. When that is ready, first put down the plate (don't forget to lube everything). REMEMBER, the large "ski jump" goes towards the passenger side of the car with the tabs pointing towards the roof. On top of the plate, you need to install the second part of the quick shift kit... the spacer. The spacer goes on with the larger part towards the bottom, hence the smaller part to the top.
Then on top of that goes the shifter assembly (don't forget to put on the spring first!). Now you just put the ball, in the joint on the shift rod, and push the shifter assembly down towards the tunnel, and get everything lined up square. Then you use the third part of the quick shift kit... the extra long bolts. Put the old washers on the new bolts, and screw them in. Not tight at first, because you need to adjust the shifter first.
STEP 14) Now you just need to fiddle around with the adjustment until it is perfect. Make sure that ALL the gears engage fully, its not overly difficult to get into gear, AND the shifter is in the position that you want. What I found, that messed me up on the shifter adjustment, is the spacer from the quick shift kit. It puts a considerable gap between the shifter bottom, and the plate. Without the quick shift kit, the shifter bottom sits inside the flanges on the plate. But with the spacer, it makes both assemblies to be separate, and therefore not line up properly with each other (they are not able to adjust with each other as one unit). What I found works best, is to get everything lined up how you want, and then look 'straight' on from above, and center the plate Left/Right, and Top/Bottom. Tighten the bolts down, when lined up correctly. You will know its not lined up correctly when it misses shifts and grinds, and is sometimes hard to put into gear.
STEP 15) It is now time to put your VW back together! You can start off buy putting the rear shift coupler inspection plate back on, and then the front tunnel access plate (or deformation plate) on. Then you can reinstall your seats, and carpet (if you had to take them out in the first place).
STEP 16) DRIVE! Take your car out for a nice, long drive. Make SURE everything is working properly. It should feel MUCH BETTER now!!
WARNING, use article at own risk! Please, DO NOT blame me for anything wrong in this article. I am not responsible for any damage to your vehicle, nor am I responsible for any bodily harm incurred as a result of using this article. Use this article as reference only, ALWAYS try to be as safe as possible when working on your vehicle! Respect your car, and it will respect you!